Welcome to the exciting world of bow hunting!
As an avid hunter myself, I understand the thrill and satisfaction that come from successfully taking down game with a recurve bow.
Getting your bow set up correctly is crucial for achieving accuracy and consistency in your shots.
In this guide, I will walk you through the step-by-step process of recurve bow hunting setup, providing you with valuable tips and tricks along the way. Let’s dive into the world of recurve bows for hunting and get ready for a successful hunting season!
Gather Your Equipment For a Recurve Bow Hunting Setup
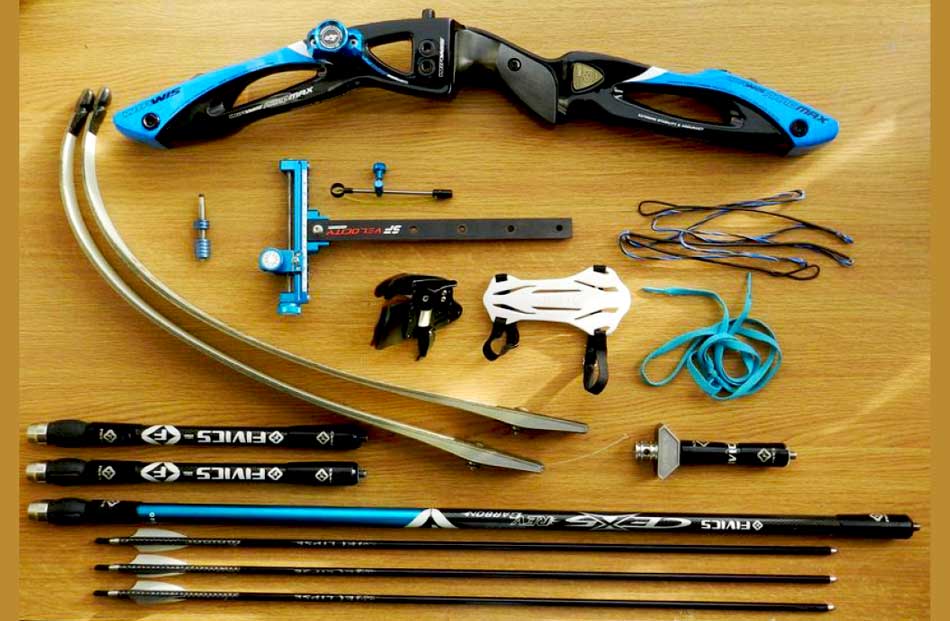
Before we dive into the setup process, let’s make sure you have all the necessary equipment at hand:
- A recurve bow: Make sure it has an appropriate draw weight for hunting, typically between 40 and 60 pounds.
- Bowstring: Ensure it is in good condition and properly sized for your bow.
- Sight: optional but can greatly improve your aiming accuracy.
- Arrow rest: Choose one that suits your shooting style, such as a flipper or elevated rest.
- Nocking point: a small brass ring placed on the bowstring to consistently position your arrow.
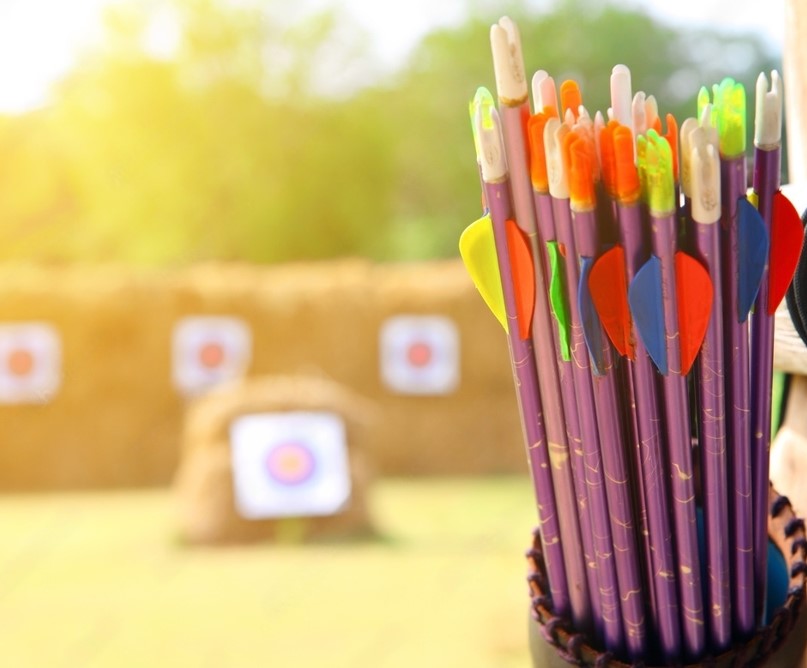
- Arrows: Select arrows specifically designed for hunting, matched to your bow’s draw weight and length.
- Quiver: To hold your arrows securely while hunting
- Finger tab or glove: protects your fingers when drawing and releasing the bowstring.
- Armguard: Prevents the bowstring from slapping against your forearm during the release.
- Bow case: keeps your bow safe and protected during transportation.
By gathering these essential components, you can proceed with confidence in your recurve bow hunting setup.
Prepare Your Bow
Once you have gathered all the necessary equipment, it’s time to prepare your bow for hunting.
- Inspect your bow for any damage or wear.
- Make sure all the components are in good working condition.
- String your bow by attaching the bowstring to the limb tips.
- Check the brace height, which is the distance between the bowstring and the grip.
- Adjust it if necessary to achieve the recommended brace height for your bow.
- Attach the sight to your bow, if you are using one.
- Install the arrow rest on your bow.
- Make sure it is securely attached and aligned with the bowstring.
- Place the nocking point on the bowstring.
- It should be positioned consistently for each shot.
- Adjust the draw weight of your bow, if needed.
Prepare Your Arrows

Now that your bow is ready, it’s time to prepare your arrows for a successful recurve bow hunting setup
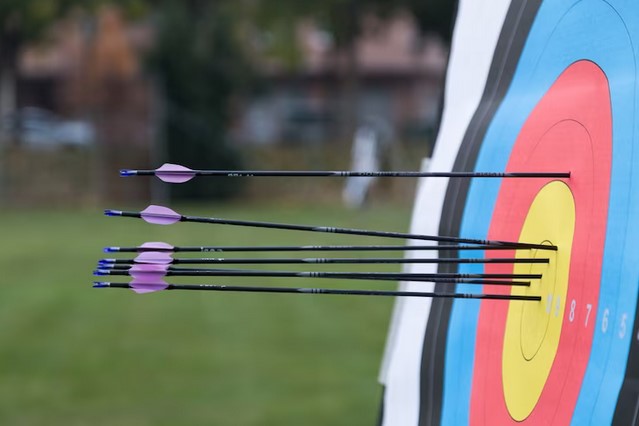
- Inspect your arrows for any damage or defects.
- Make sure the shafts are straight and the fletching is intact.
- Measure the length of your arrows and cut them to the appropriate size for your draw length.
- Install the arrowheads on your arrows.
- Make sure they are securely attached and aligned with the shafts.
- Attach the fletching to your arrows.
- They should be positioned evenly around the shafts.
- Check the weight of your arrows.
- They should be matched to your bow’s draw weight for optimal performance.
- Inspect the nocks on your arrows.
- They should be in good condition and properly aligned with the fletchings.
Prepare Yourself
Lastly, it’s important to prepare yourself for hunting with a recurve bow.
- Practice shooting regularly to improve your accuracy and familiarize yourself with your bow.
- Wear appropriate clothing and footwear for hunting, taking into consideration the weather and terrain.
- Apply scent control products to minimize your scent and avoid alerting game animals.
- Learn about the hunting regulations and obtain any necessary licenses or permits.
- Plan your hunting strategy and familiarize yourself with the hunting area.
Remember to always prioritize safety and ethical hunting practices when using a recurve bow for hunting.
Step 1: Stringing Your Bow
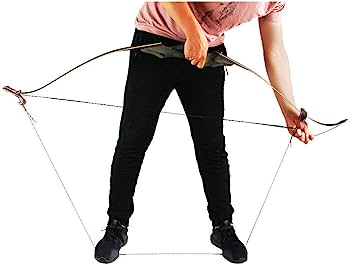
- Step onto the stringer, placing your foot in the middle, and hold the other end of the stringer against the lower limb tip.
- Using both hands, pull upwards on the handle of the bow while simultaneously pushing down with your foot on the stringer.
- This will flex the limbs, allowing you to slide the string into position.
Step 2: Adjusting Your Brace Height
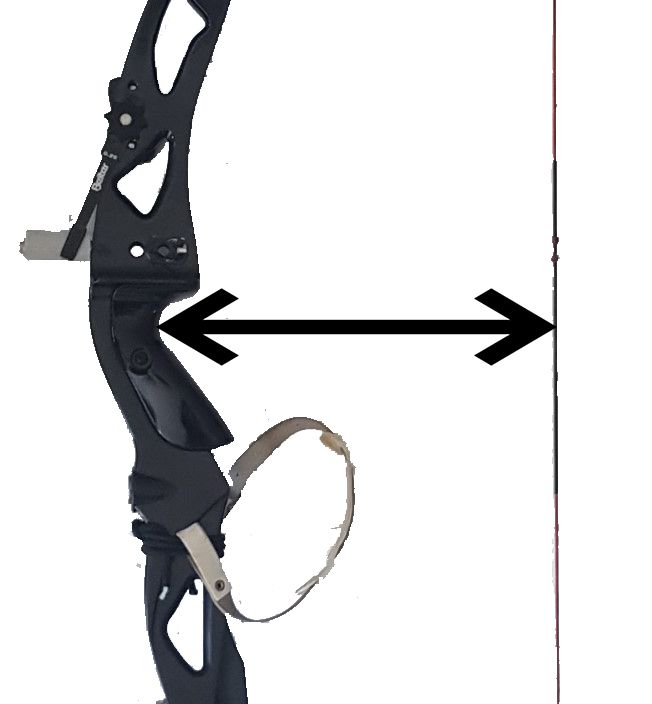
The brace height of your recurve bow refers to the distance between the string and the deepest part of the grip when the bow is unstrung.
Here’s how to adjust it: A proper brace height contributes to a successful recurve bow hunting setup.
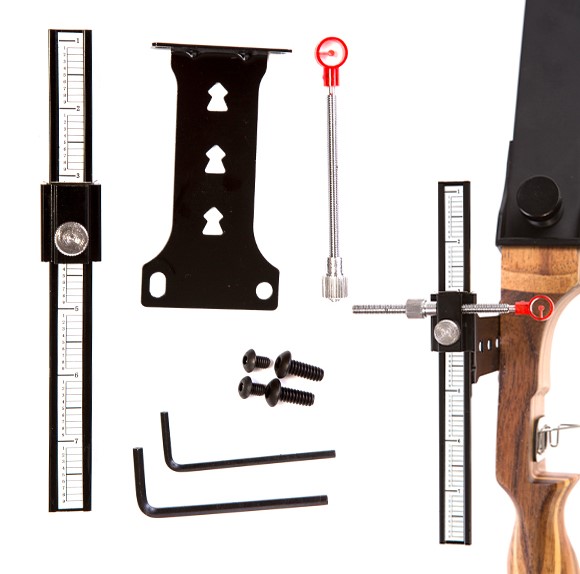
- Measure the brace height by using a ruler or a brace height gauge.
- Place the ruler or gauge against the deepest part of the grip and measure the distance to the string.
- If the brace height is too high, meaning the distance is greater than the recommended measurement, you can decrease it by twisting the string.
- To do this, twist the string in the direction that tightens it, making sure to twist both ends equally.
By measuring and ensuring it falls within the recommended range, you optimize performance and accuracy. If it’s too high, twist the string equally on both ends to decrease it. A proper brace height contributes to a successful recurve bow hunting setup.
Step 3: Nocking Your Arrow
Nocking your arrow properly is essential for accurate shooting.
Here’s how to do it:
- Hold the arrow by the shaft, with the fletching (feathers or vanes) facing away from you.
- Place the nock (the plastic or metal piece at the end of the arrow) onto the bowstring, just below the nocking point.
Step 4: Checking Your Arrow Rest
The arrow rest is the part of the bow that supports the arrow during the shot.
Here’s how to check:
- Visually inspect the arrow rest to ensure it is aligned with the bowstring and centered on the bow riser.
- Check that the arrow rest is securely attached to the bow and that there are no loose or damaged parts.
Step 5: Adding a Sight (Optional)
A sight can greatly enhance your accuracy by providing a reference point for aiming.
If you choose to use one, follow these steps:
Selecting a Sight
- Select a sight that suits your shooting style and preferences.
- There are various types available, including fixed pin sights and adjustable target sights.
Attaching the Sight
- Attach the sight bracket to the bow riser using the provided screws or mounting hardware.
Aligning the Sight
- Position the sight pins or aperture in line with your dominant eye.
- This will ensure proper alignment when aiming.
Adjusting the Sight
- Adjust the sight pins or aperture according to the distance you plan to shoot.
- Start at a reasonable distance, such as 20 yards, and fine-tune as needed during practice sessions.
Step 6: Selecting the Right Arrows
Choosing the correct arrows for hunting is crucial for optimal performance and the ethical harvesting of game.
Consider the following factors when selecting your arrows:
Spine
The spine refers to the stiffness of an arrow shaft.
It needs to match the draw weight and length of your bow to achieve proper flight and accuracy.
Weight
Ensure that the total arrow weight, including the broadhead, falls within the recommended range for your specific bow model.
A heavier arrow may provide better penetration, while a lighter one may offer a flatter trajectory.
Broadheads
Select broadheads designed specifically for hunting.
Fixed-blade broadheads are popular for their simplicity and reliability, while mechanical broadheads offer greater accuracy at longer distances.
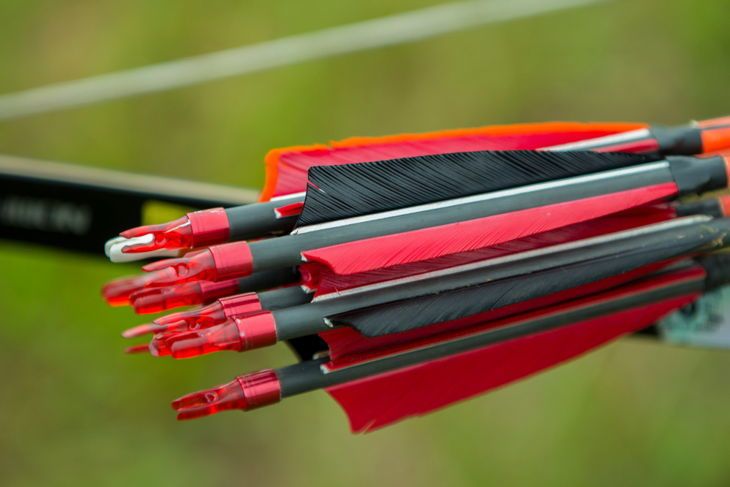
Fletching
Consider the type of fletching (feathers or vanes) that suits your shooting style.
Vanes offer more consistency in various environments, while feathers offer better stabilization but are susceptible to weather conditions.
By carefully selecting your arrows, you can enhance your recurve bow hunting setup and achieve successful and ethical hunts.
Step 7: Fine-Tuning Your Bow
Once you have set up all the basic components of your recurve bow, it’s time to fine-tune its performance.
Here are some tips to help you achieve optimal results:
Paper tuning
Shoot an arrow through a sheet of paper positioned about seven feet away from you.
Observe the tear pattern on the paper to assess any adjustments needed in terms of center shot alignment or nocking point placement.
Bare shaft tuning
Shoot a bare arrow shaft without fletching to evaluate its flight characteristics.
Adjust the brace height, nocking point, or spine stiffness if necessary to improve arrow flight.
Did you know?
Bare shaft tuning helps you identify any issues with your bow’s setup that may affect arrow flight.
Tiller adjustment
Check the tiller, which refers to the difference in distance between the string and the top and bottom limbs.
It should typically be around 1/8 inch positive tiller, meaning the top limb is slightly closer to the string than the bottom limb.
Fun fact: Tiller adjustment ensures that the bow limbs are balanced and working together properly.
Silencing accessories
Consider adding silencers, such as string dampeners or limb savers, to reduce noise and vibration during the shot.
This can increase your stealthiness when hunting.
Pro tip: Silencing accessories not only make your bow quieter but also help improve your accuracy by reducing vibration.
Regular maintenance
Keep your bow clean and well-maintained by periodically inspecting the limbs, strings, and other components for signs of wear or damage.
Replace worn-out parts promptly to ensure safety and optimal performance.
Did you know?
Regular maintenance is crucial for the longevity and performance of your recurve bow.
By following these steps, you can achieve a well-tuned recurve bow hunting setup.
How Should I Aim With a Recurve Bow For Hunting?
Aiming with a recurve bow for hunting requires technique and precision . To ensure a successful shot, follow these steps:
1. Stance and Alignment:
Start by standing with your feet shoulder-width apart, perpendicular to your target. Align your body towards the target, keeping your shoulders relaxed and level. This will establish a solid foundation for consistent shooting.
2. Grip and Hand Placement:
Hold the bow grip with a relaxed but firm grip. Your hand should be positioned in the webbing between your thumb and index finger. Avoid gripping too tightly, as this can cause torque and affect arrow flight.
3. Nocking the Arrow:
Place the arrow on the arrow rest, aligning the nock with the bowstring. Ensure the arrow is fully seated and secure.
4. Pre-draw:
Bring the bow up to shoulder level, keeping your bow arm extended but not locked. Your drawing hand should be positioned below your jawline, with your fingers lightly gripping the bowstring.
5. Drawing the Bow:
Use your back muscles to smoothly draw the bowstring towards your anchor point, which is a consistent spot on your face where you anchor the string for each shot. Common anchor points include the corner of the mouth or the chin. Maintain a relaxed grip on the bowstring throughout the draw.
6. Aiming:
With a recurve bow, the aiming technique is known as “gap shooting.” This method involves visually estimating the distance between your target and the point where the arrow will strike. It is important to practice and develop your own personal gap-shooting technique to become more accurate and consistent.
7. Release:
When you are ready to release the bowstring, maintain a steady aim and smoothly release your fingers from the bowstring. Avoid punching or jerking the string, as this can affect arrow flight.
8. Follow-through:
After the release, continue to hold your bow arm steady and follow through with your shot. This means keeping your body aligned with the target and watching the arrow as it flies towards it. This will help you analyze the shot and make any necessary adjustments for future shots.
How Can I Increase The Accuracy of a Recurve Bow for Hunting?
1. Choosing the Right Bow:
Selecting a recurve bow that suits your physique, preferences, and shooting style is vital for accuracy. Consider factors such as draw weight, bow length, and grip comfort. A properly fitted bow will enable consistent shooting and improved accuracy.
2. Perfecting Your Shooting Technique:
Developing proper shooting technique is essential for accurate recurve bow hunting. Focus on the following aspects:
- Stance: Adopt a stable and balanced stance with feet shoulder-width apart, perpendicular to the target. Keep your body aligned with the target.
- Anchor Point: Establishing a consistent anchor point is crucial. Ensure the string consistently touches the same spot on your face during each shot. This helps in maintaining consistent draw length and greatly enhances accuracy.
- Grip: Maintain a relaxed grip on the bow handle. Tightly gripping the bow leads to torque and inconsistent shots. Experiment with various grip styles to find the most comfortable and stable one for you.
- Release: Work on achieving a smooth and controlled release. Jerky or inconsistent releases can greatly affect the accuracy of your shot. Practice releasing the string while maintaining a steady aim to improve accuracy.
3. Proper Arrow Selection:
Choosing the right arrows for your recurve bow is crucial for accuracy. Consider factors such as arrow length, spine stiffness, and tip weight.
Consult with a knowledgeable archery specialist to ensure you are using arrows that are compatible with your bow and shooting style.
4. Regular Bow Maintenance:
Regular maintenance of your recurve bow is essential for optimal accuracy. Inspect the bow and its components for any signs of wear or damage. Check the string for fraying or stretching, and replace it if necessary.
Keep the limbs and riser clean and free from dirt and debris. Additionally, ensure that the bowstring is properly waxed to promote smooth shooting.
5. Consistent Practice:
Like any skill, accuracy with a recurve bow requires practice. Dedicate regular time to shooting and practicing your technique. Set up targets at various distances and practice shooting from different positions and angles.
The more you practice, the more familiar you will become with your bow and the more accurate your shots will be.
What is The Best Way to Ensure a Proper Release of an Arrow With a Recurve Bow?
For hunting enthusiasts who prefer the classic appeal and challenge of using a recurve bow, mastering the proper release technique is essential.
Achieving a clean and accurate arrow release not only enhances your shooting skills but also ensures a humane and ethical hunting experience.
We will explore the best way to ensure a proper release with a recurve bow, providing you with expert tips to elevate your archery game to new heights.
1. Grip and Finger Placement:
The foundation of a successful arrow release lies in your grip and finger placement. To achieve optimal control and consistency, follow these steps:
- Place the bow grip deep into the fleshy part of your hand, creating a secure and stable hold.
- Hook your fingers around the bow’s riser, ensuring a relaxed and natural grip.
- Position your index, middle, and ring fingers above the arrow nock, with your pinky finger resting below the arrow.
2. Focus on Back Tension:
Maintaining proper back tension throughout the shot sequence is crucial for a clean arrow release. Here’s how to achieve it:
- Draw the bowstring smoothly, using your back muscles rather than relying solely on your arms.
- As you anchor the string to the corner of your mouth or your cheekbone, focus on squeezing your shoulder blades together.
- Engage your core muscles to maintain a solid posture, keeping your torso straight and strong.
3. Anchor Point Consistency:
Consistency at your anchor point is key to a proper arrow release. This refers to the position at which you bring the bowstring to your face before releasing the arrow. Follow these guidelines for a consistent anchor point:
- Choose a specific reference point on your cheek or jawbone and aim to touch it with the same spot on your hand every time you anchor.
- Align your dominant eye with the string and the arrow, ensuring proper sight alignment.
- Avoid anchoring too high or too low on your face, as this can lead to inconsistent shots.
4. Follow-Through:
Maintaining a smooth and controlled follow-through is crucial for a proper arrow release. Here’s how to execute it effectively:
- After releasing the arrow, keep your bow arm fully extended and your fingers relaxed.
- Allow your hand to naturally move backward until it comes to a stop.
- Keep your focus on the target and resist the urge to immediately look at where the arrow landed.
5. Practice, Practice, Practice:
Mastering the art of proper arrow release with a recurve bow takes time and practice. Here are some additional tips for refining your technique:
- Start with close-range targets and gradually increase the distance as your accuracy improves.
- Incorporate mental exercises into your practice routine, such as visualization and focus drills.
- Seek feedback from experienced archers or consider working with a coach to fine-tune your technique.
- Consistency is key, so make sure to practice regularly to maintain and improve your skills.
- Pay attention to your form and technique during each practice session, focusing on implementing the tips mentioned above.
- Take advantage of different shooting scenarios, such as shooting from different positions or angles, to challenge yourself and improve your adaptability.
- Don’t forget to also practice proper maintenance and care for your recurve bow, as a well-maintained bow can greatly enhance your shooting experience.
Final Touch
In a complete recurve bow hunting setup, Once you have adjusted the draw weight, arrow rest, and sight alignment on your recurve bow for hunting, it’s time to add the final touch. Apply a high-quality string silencer to reduce noise and vibrations during the shot.
This small addition can make a significant difference in maintaining stealth and accuracy while out in the field.
Fine-tune your recurve bow by installing limb dampeners. These not only absorb excess vibration but also enhance stability and control.
By reducing hand shock and minimizing movement upon release, these additions improve overall shooting performance for a more successful hunting experience.
Frequently Asked Questions About Recurve Bow Hunting Setup:
How should I store my recurve bow?
It is recommended to store your recurve bow in a dry, clean place away from direct sunlight to prevent warping or loosening of the limbs.
Can extreme temperatures and humidity damage my bow?
Yes, extreme temperatures and humidity can potentially damage your recurve bow. It is important to protect it against these conditions.
How do I maintain the condition of the string and cables?
To maintain the condition of the string and cables, it is advised to periodically apply wax to them. This helps prevent fraying and excessive wear.
What accessories should I inspect for damage?
It is important to inspect accessories such as the arrow rest, sight pins, and other attachments for any damage that could hinder their functionality while hunting.
How can I reduce noise and vibrations while shooting?
Adding a high-quality string silencer to your recurve bow can help reduce noise and vibrations during the shot, maintaining stealth and accuracy.
Can I use limb dampeners on any recurve bow?
Limb dampeners can generally be used on most recurve bows, but it is always recommended to check with the manufacturer or consult a professional to ensure compatibility and proper installation.
Can I increase the power of my recurve bow?
While you can’t directly increase a bow’s power, you can optimize its performance through proper tuning and using high-quality arrows matched to your draw weight.
Are more expensive bows always more powerful?
Not necessarily.
Price often reflects the quality of materials and craftsmanship, but there are affordable options that offer impressive power and performance.
Do I need any additional accessories for my recurve bow hunting setup?
While not necessary, some hunters may find additional accessories beneficial, such as a bow quiver for carrying arrows, an armguard for protection, or a bow release aid for improved consistency. The choice of additional accessories depends on personal preference and shooting style.

I love reading through an article that can make men and women think.
Also, many thanks for permitting me to comment! You can see
similar: najlepszy sklep and
here sklep internetowy
Wow, amazing weblog layout! How long have you been running a blog
for? you make running a blog glance easy. The overall look of your site is wonderful, let
alone the content material! You can see similar: najlepszy sklep and here najlepszy sklep